The enchantment of a smart home with Home Assistant#
Home Assistant is a true magician when it comes to transforming your home into an intelligent and responsive environment. By connecting all your devices, infinite doors open to automations you could only dream of before! While many appliances integrate with a simple “plug-and-play,” others, like Daikin Madoka systems, present a more intriguing challenge due to their exclusive Bluetooth connectivity.
Previous challenges: a winding road#
In my quest for the perfect integration for Madoka devices, I explored several avenues. Online, you can find solutions ranging from custom HACS integrations to proposals based on specific hardware. Although I haven’t tested the hardware solutions, the HACS integration, while promising, often proved unstable, forcing me into frustrating reboots and reconnections.
The revelation: ESPHome to the rescue!#
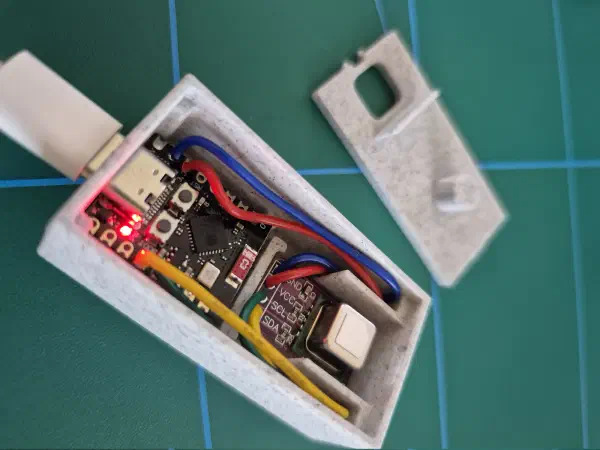
After various attempts and sleepless nights, I finally discovered the solution I’ve been successfully using for a year or two: ESPHome! I found a repository that leverages the bluetooth-proxy base to connect an ESP32 to the Madoka, creating a solid and reliable bridge.
Here’s the ESPHome configuration that changed everything:
esphome:
  name: "hub-madoka"

esp32:
  board: esp-wrover-kit
  framework:
    type: esp-idf

wifi:
  ssid: !secret wifi_ssid
  password: !secret wifi_password

# Enable logging to monitor everything
logger:

api:
  encryption:
    key: !secret api_key

ota:
  platform: esphome
  password: !secret esphome_secret

esp32_ble_tracker:
  scan_parameters:
    # You can experiment with these parameters, but the default is excellent
    #interval: 1100ms
    #window: 1100ms
    active: true # Active scanning for better detection

external_components:
  - source: github://Petapton/esphome@madoka
    components: [ daikin_madoka ]

esp32_ble:
  io_capability: display_yes_no # Crucial for display pairing

ble_client:
  - mac_address: "AA:BB:CC:DD:EE:FF"  # <--- DON'T FORGET TO CHANGE THIS!
    id: madoka_climate

climate:
  - platform: daikin_madoka
    name: "Madoka Climate Control" # A catchy name for your climate control
    ble_client_id: madoka_climate
update_interval: 15s # Updates every 15 seconds for optimal responsiveness2025.6.1 and updating the ESP32 firmware resolves the issues.daikin_madoka (previously it was just madoka)Your step-by-step guide to perfect integration!#
Follow these simple steps to bring your Daikin Madoka into the world of Home Assistant:
- Find the Madoka’s MAC: Use the nRF Connect app (available for Android and iOS) to scan for and identify the unique MAC address of your Madoka device. It’s your passport!
- Program the ESP32: Upload the firmware to the ESP32 via ESPHome, remembering to replace “AA:BB:CC:DD:EE:FF” with your Madoka’s MAC address found in step 1.
- Activate Bluetooth on Madoka: Make sure the Bluetooth function is active on your Daikin Madoka device.
- Magical pairing: A pairing code will appear on the Madoka’s display. Confirm this code! For a double-check, the same code will also be visible in your ESP32’s logs.
- Add to Home Assistant: Go to Home Assistant integrations and add the new ESPHome device.
- Enjoy your smart home: Congratulations! You are now ready to control your Daikin Madoka directly from Home Assistant and create the smart home automations of your dreams.